
How to Create an Open Plan Living Space
Hello! I’m very excited to show you some before and afters of an open plan space that I worked on in Chorlton, Manchester last year. I'll also be sharing my top tips on how to create an open plan design that works.
The property is a two bedroom flat which was built about 10 years ago and the lovely client lives here with her seven year old daughter. There are two bedrooms, a bathroom and an en-suite but this room is the only communal space so it has a LOT of jobs to do. Open-concept spaces have become really popular in recent years and they can work brilliantly for modern living but only if the design and layout have been carefully considered.
When I first visited for the interior design consultation, there was a kitchen area, toy storage/play space, a living room area and desk space. Because of the furniture placement, there wasn't much space left over so there was no room at all for dining. Not ideal, especially when you’ve got a child.

Before
There wasn’t enough room for all the toys to be stored in the existing storage unit so they were overflowing and also encroaching on to the other areas.
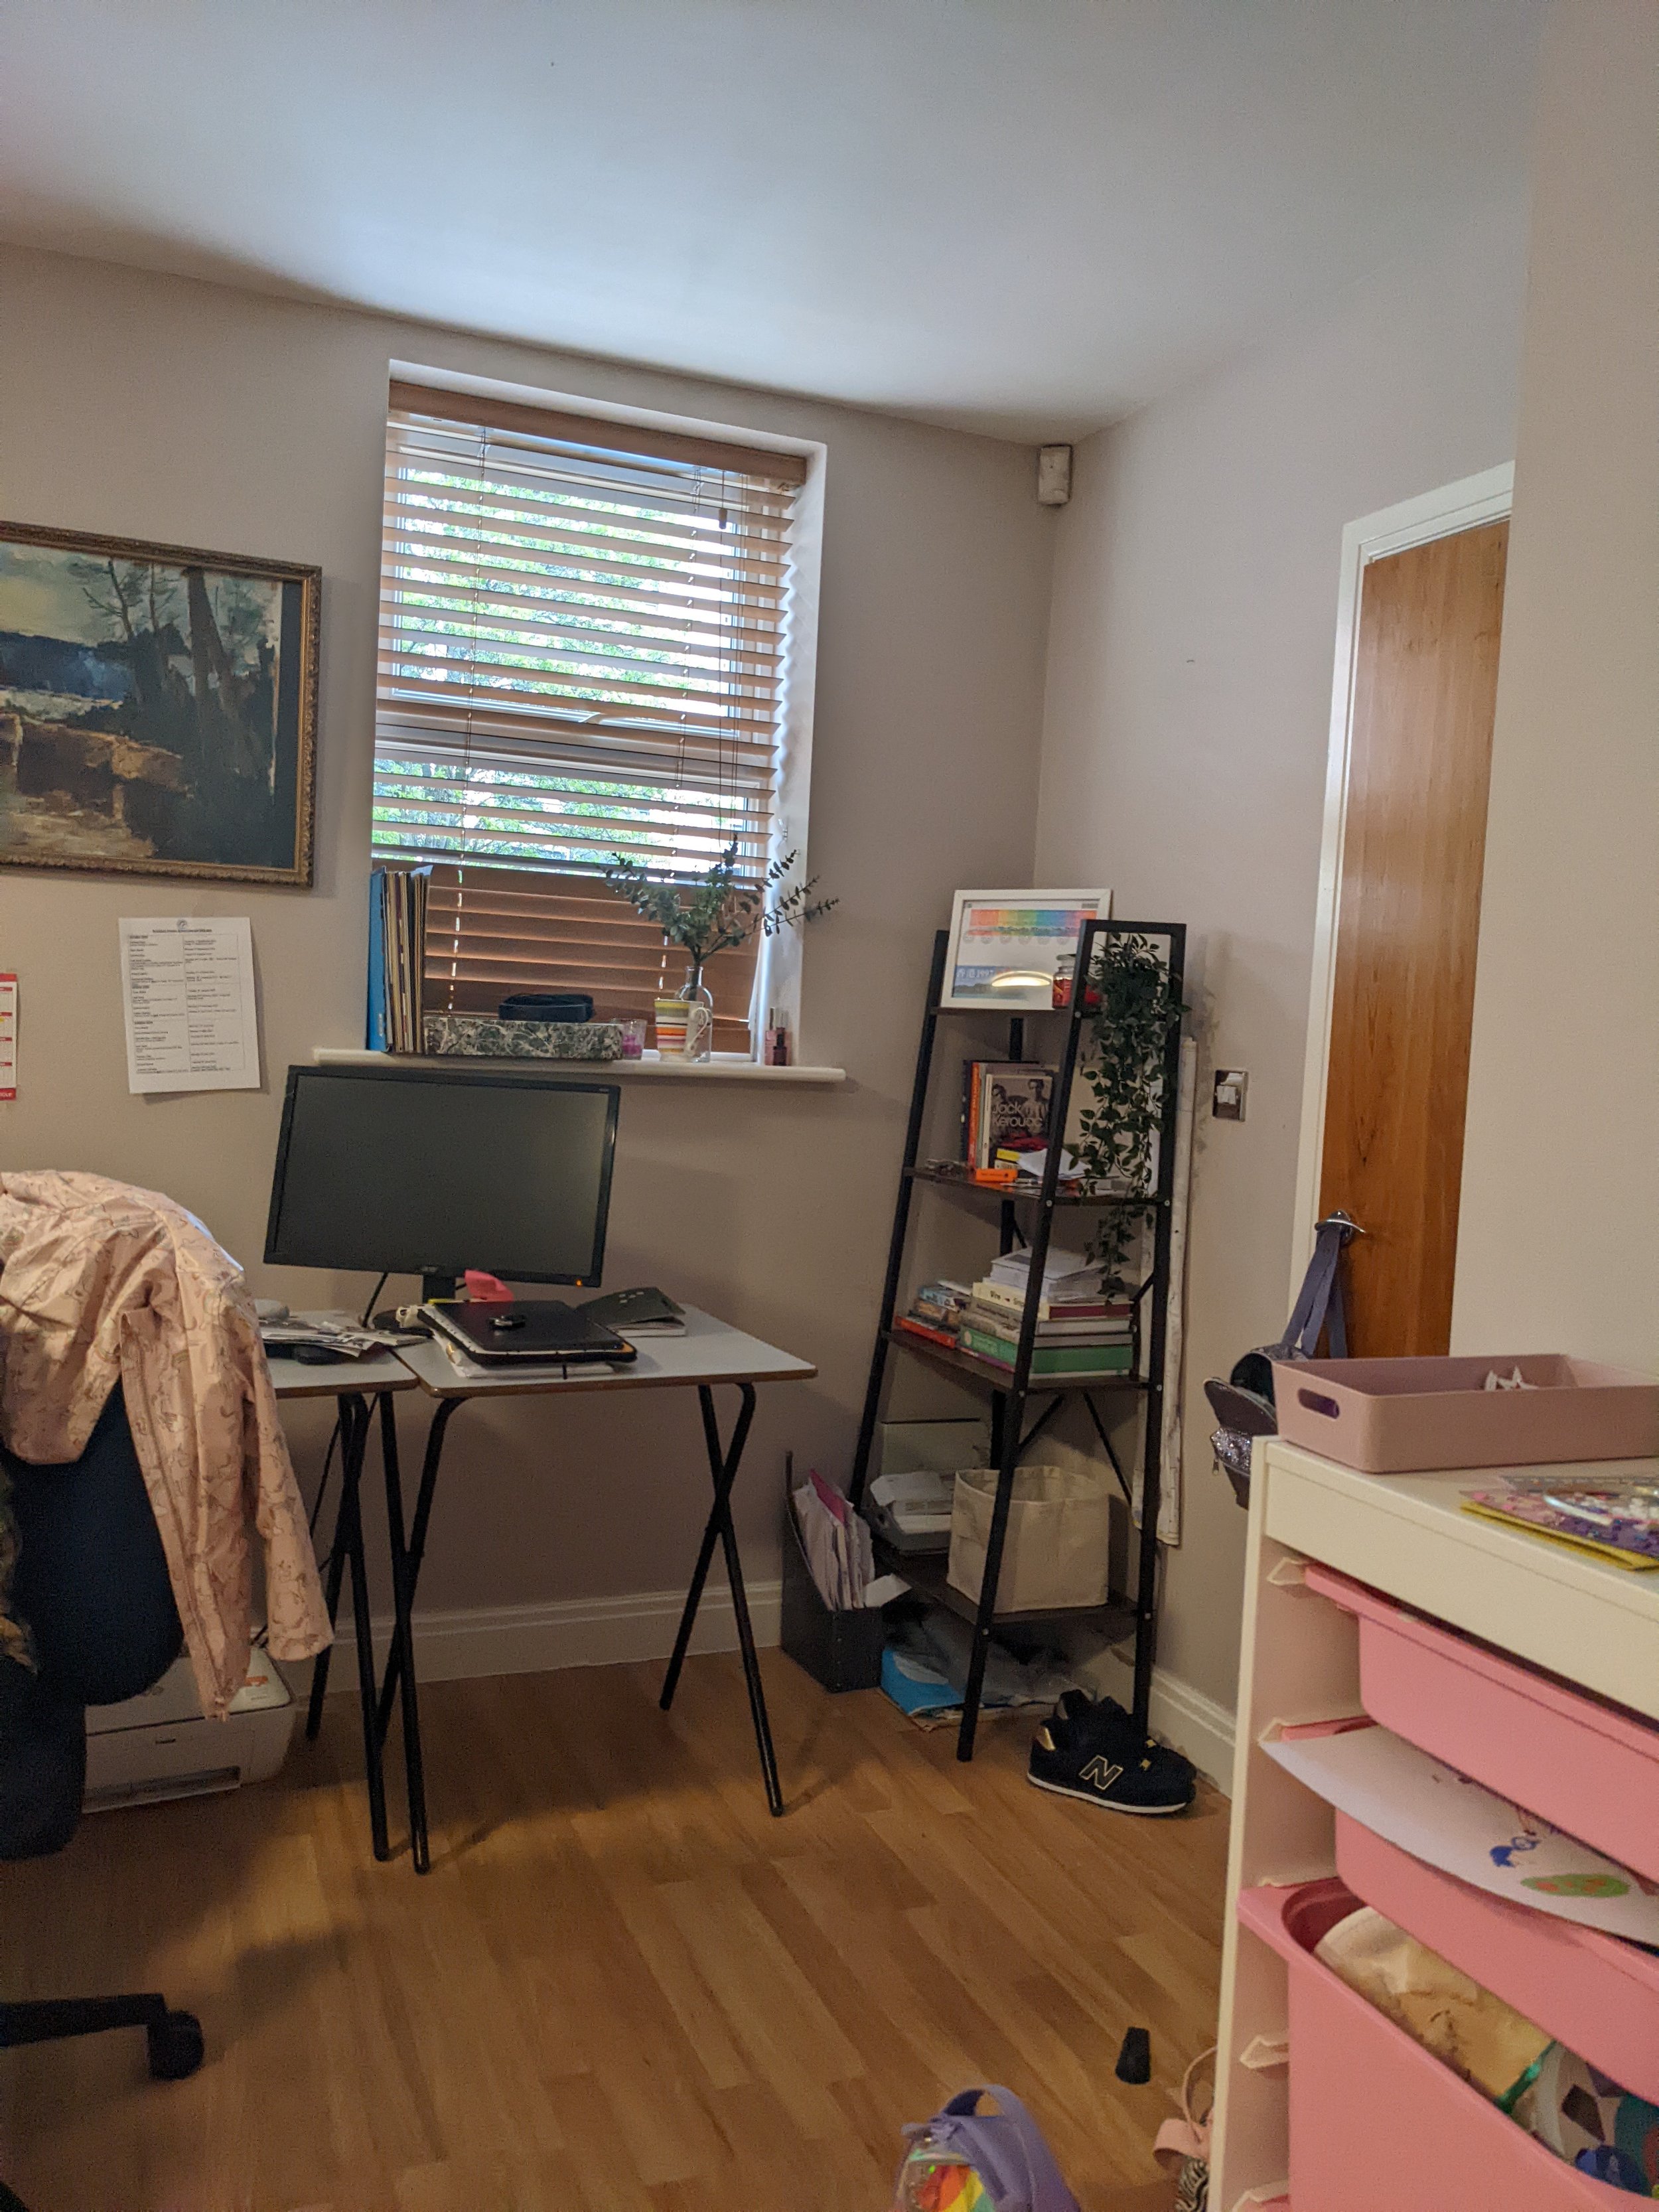
Before
Although the desk was in a good spot in the corner, it felt too open with the rest of the room. When you’re working from home, you really want to feel like you’re leaving your work behind at the end of the day.

Before
The seating area included lots of small items for storage which didn’t make the most of the available space, and toys were encroaching on this area too. We needed a much better storage solution.

Before
The Interior Design Brief
As part of the client’s interior design brief, she asked me to incorporate the following into the design:
existing kitchen
lounge/TV area
play area
dining area
office area
I love a good challenge!
The client also wanted to keep her existing orange sofa, berber style rug, record player, and office shelving in the new design. Budget was a consideration and the kitchen was in good condition so we decided to leave it as it was, with the option of doing an affordable refresh at some point when budget allows. To save on costs, we also kept the existing flooring.
Now for the after photos and my interior design tips on how to create an open-plan living space that works.
Zone the space
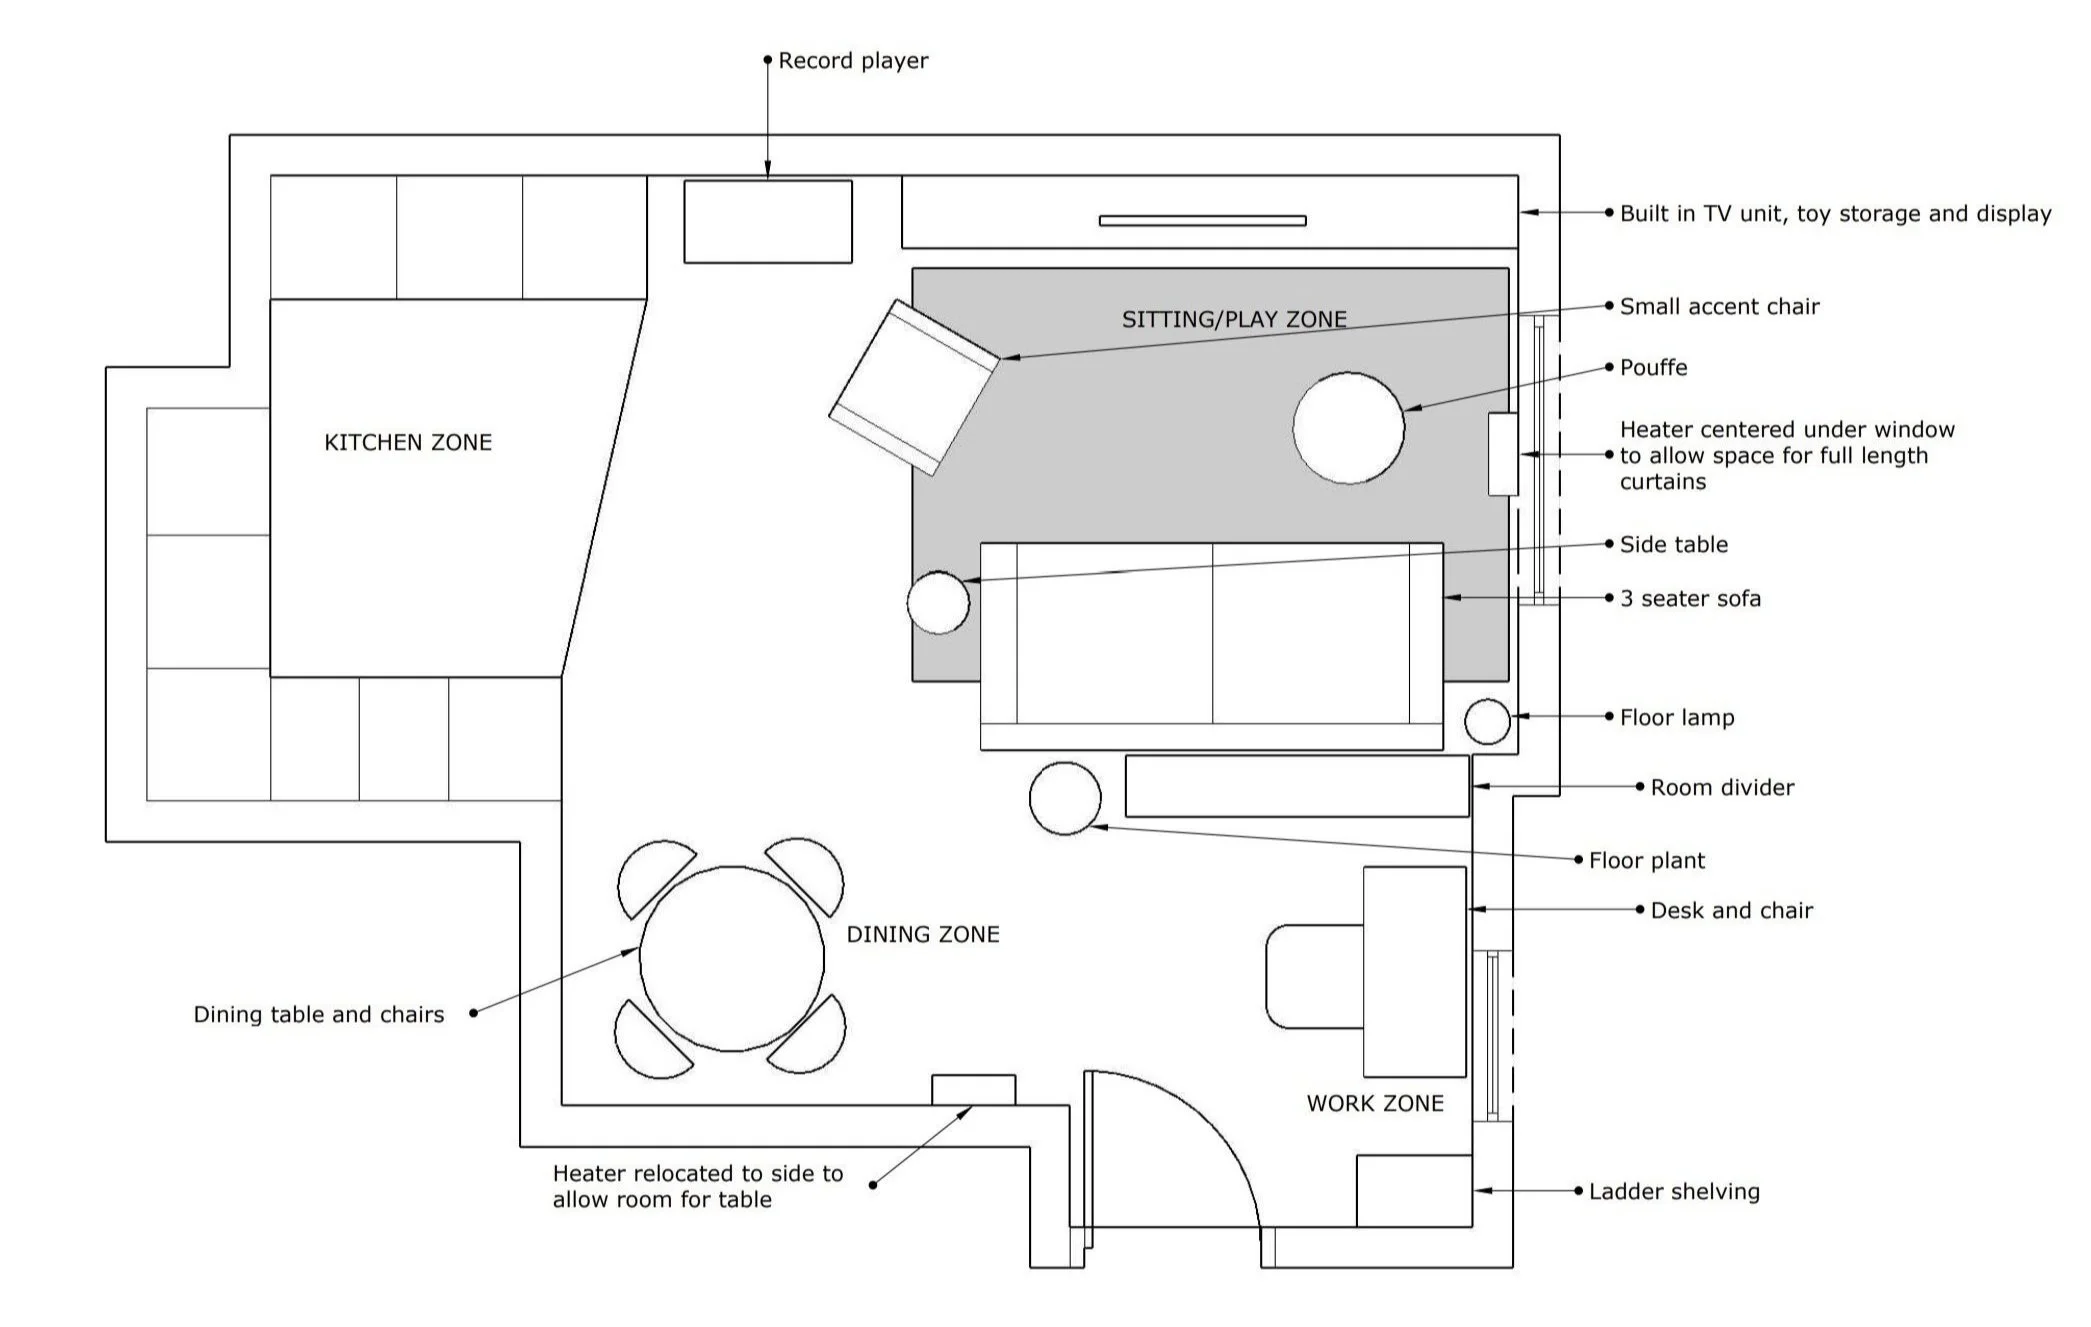
The new open-concept floor plan
When you have a small or multi-functional room, it’s really important that every inch of it is used as effectively as possible to really maximise the available space. I decided to zone the rest of the space into three distinct areas with a dining zone, a work zone and a sitting zone which would incorporate a play area with lots of toy storage.
Interior Design Board

I designed each zone to have its own feel but the different spaces all work together to create a cohesive scheme. We chose a green and blue overall colour scheme to use in across all three zones. The client loves mid-century style furniture which I was very happy about.
2. Play around with paint
Using different paint techniques is an affordable way of helping to create different zones.

After - dining zone
A half painted wall helps to zone the dining area. The bottom half of the walls are painted in Pea Green by Little Greene - the perfect shade, without being too minty or too warm. The top half are in Slaked Lime. Painting the top half of the walls and the ceiling in the same colour as each other makes the ceiling feel higher. You can see how I used the same half painted wall effect in my North Wales project here.
The client previously had wall panel heaters which aren’t the most efficient or the most good looking of heating options. We considered keeping them to save on costs but they would have really stood out against the darker walls. There’s no gas supply into the flat so we decided to replace them with electric radiators from Best Heating. We chose the Milano Aruba model.

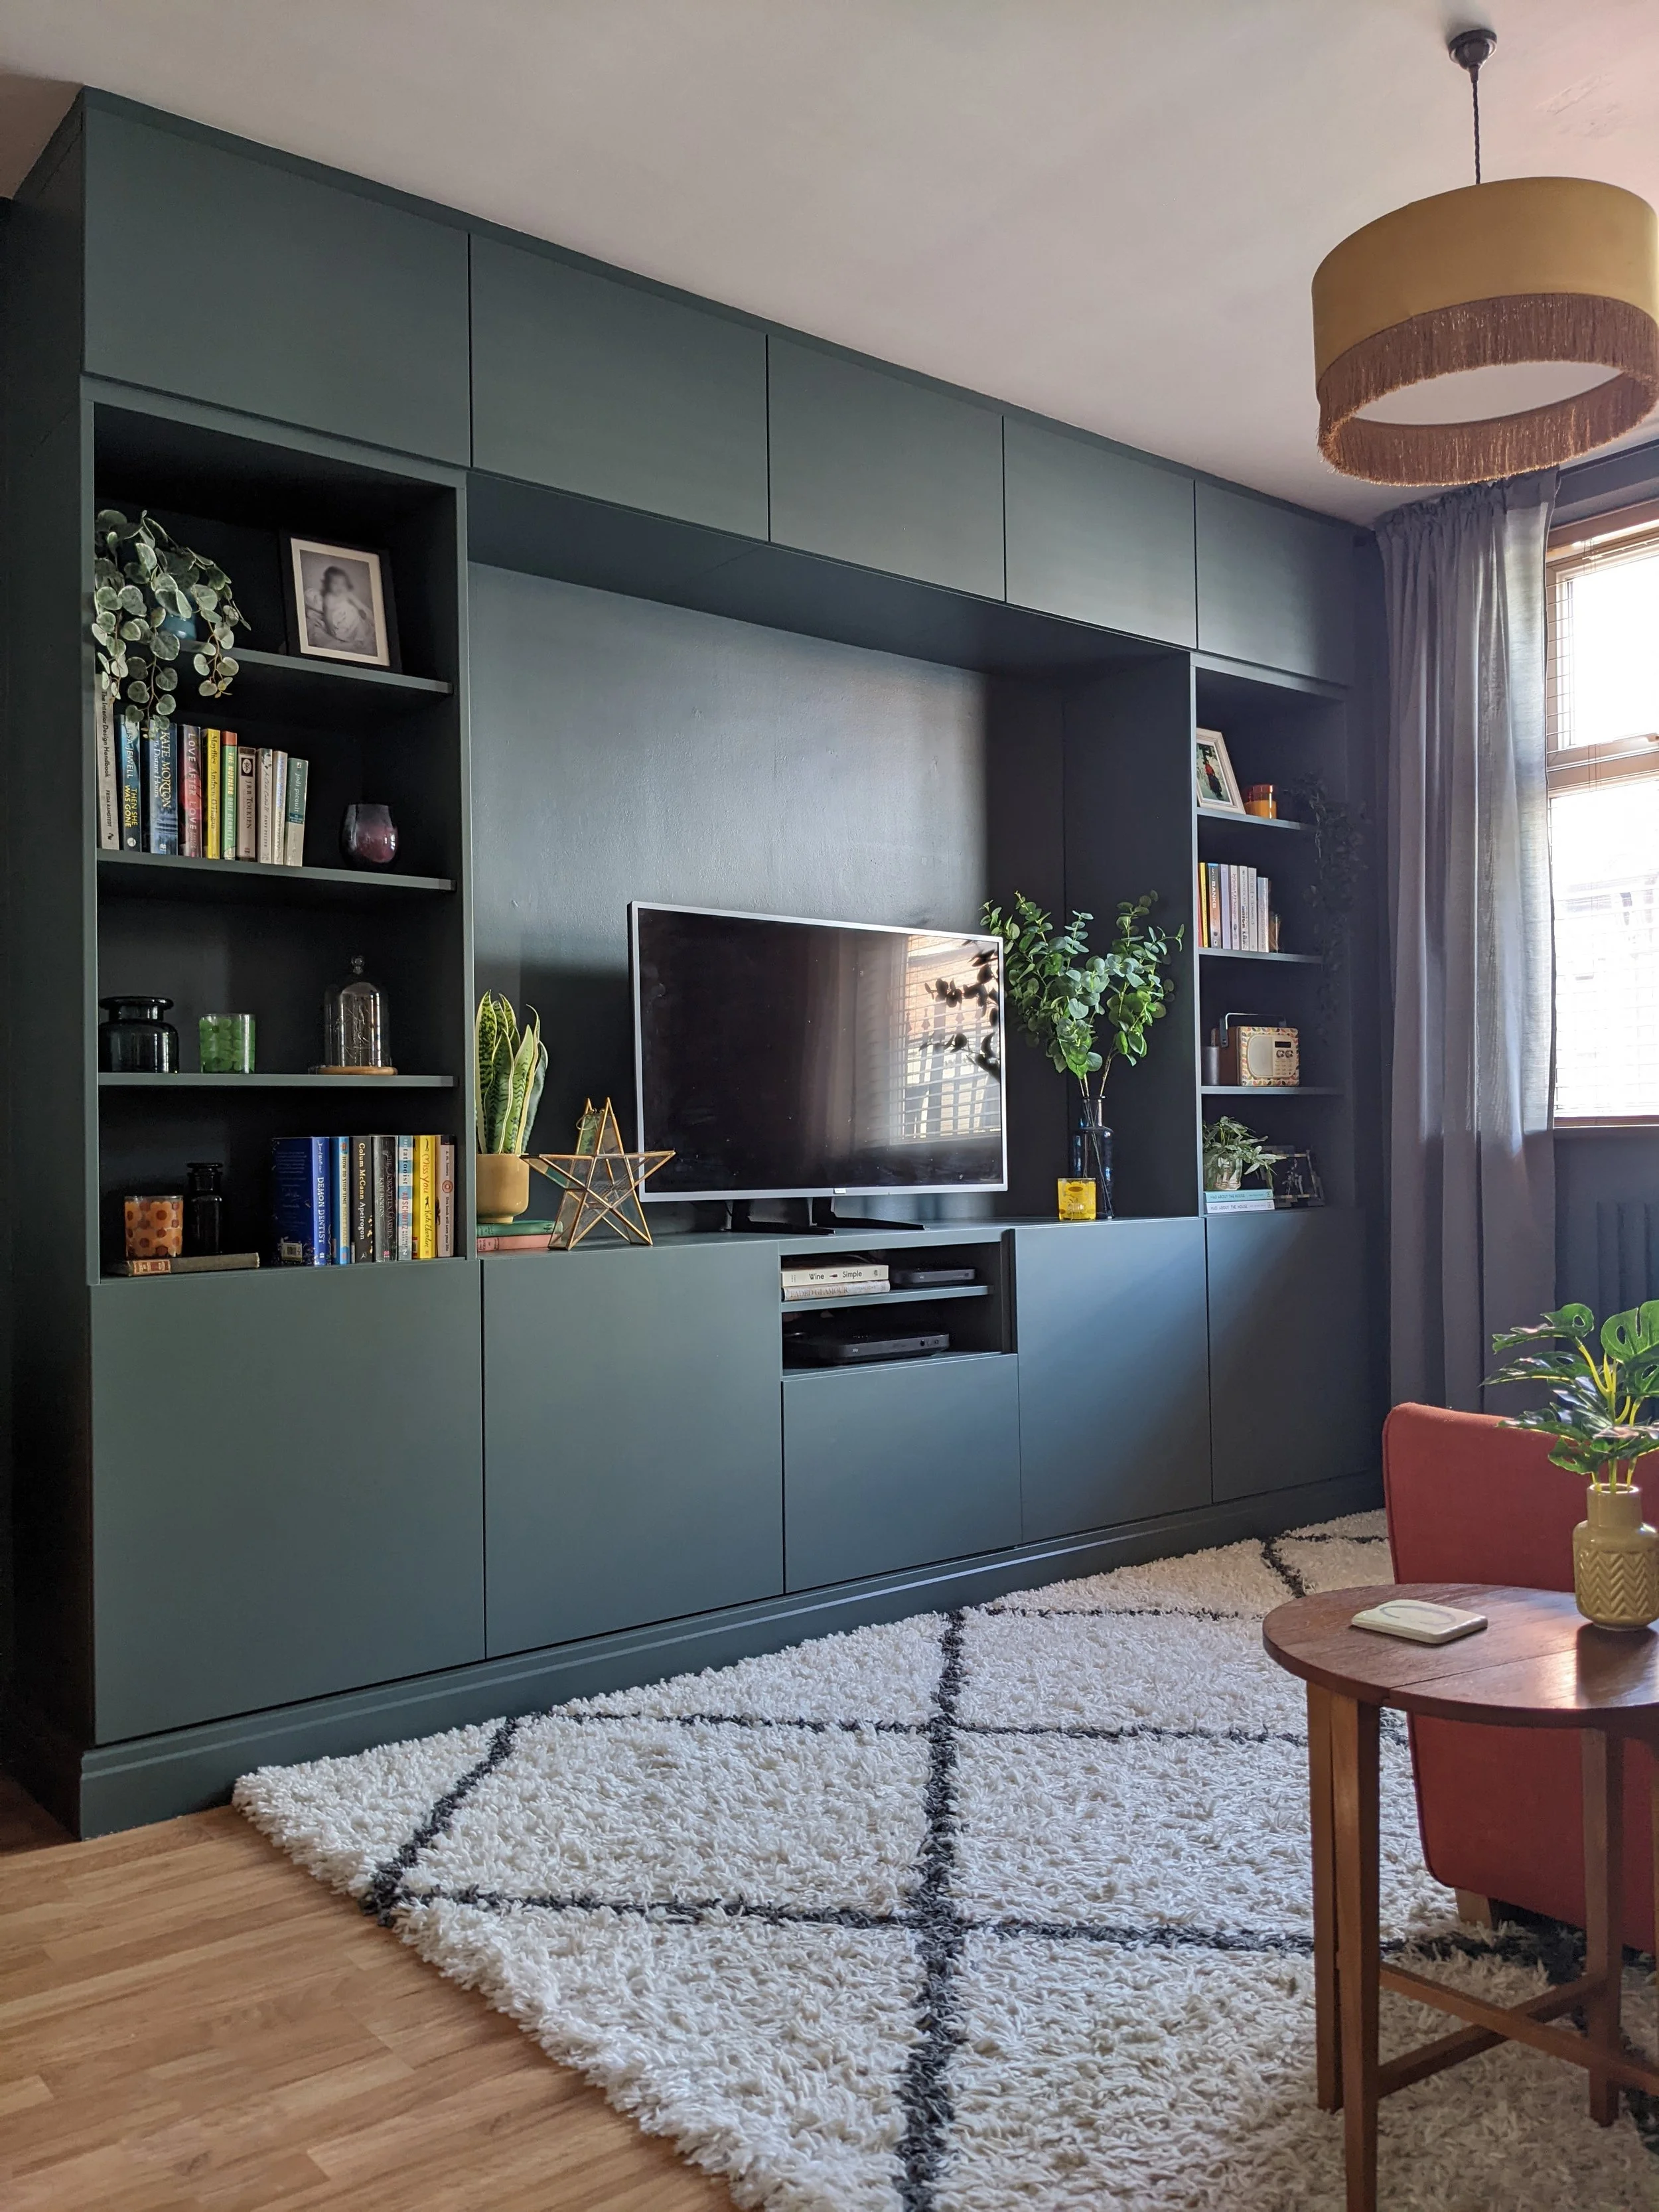
After - lounge area
In the living area, we went darker for a cocooning feel, with Knoxville Gray by Benjamin Moore wrapping around the walls and TV unit. It’s very similar to Farrow & Ball’s Inchyra Blue but has much better coverage and is more durable.
The TV unit is the BESTA TV Storage Combination from IKEA. We got a joiner to build a base, add a skirting across the front and a frame around it to give the appearance of a built in unit but at an affordable price. Then we primed it with Zinsser BIN primer and gave it two topcoats of Benjamin Moore’s Aura Eggshell. Important note: even though BIN primer says on the tin that you don’t need to sand first, don’t listen to them if you’re painting laminate furniture like this. You need to give it a really good sand, preferably with an electric sander, to give the primer a good key to adhere to. Same with Benjamin Moore Stix primer.
For paint colour advice, you can read my blog post on how to choose paint colours for your home here.
3. Add pattern to a small area with wallpaper

One of the client’s hobbies is hiking and I’d been dying to use this Moordale wallpaper by Minimoderns on a project for ages so this was the perfect opportunity! Using wallpaper in just a small area as a feature wall makes it much more affordable than papering everywhere. The gold accents on the desk and lamp give the scheme a lift.
4. Add lots of storage

The IKEA Besta cabinet provides a focal point and also incorporates LOTS of storage, both in the closed cupboards and the open shelving on either side. Storage is super important in a smaller property that doesn’t have much dedicated storage space. Toys are stored in the bottom cupboards and there’s loads of extra storage space in the top cupboards for things that don’t need to be accessed as often. Another great way to help zone a space is through the use of rugs - the large rug here provides a comfy play space for little knees. We used the client’s existing area rug but a washable rug would otherwise have been a great option. There wasn't space here for a coffee table but I added a small side table next to the sofa.
5. Get the lighting right

Although this space is south-facing, it doesn't get a lot of natural light because of the buildings opposite so we needed to make sure we incorporated the right light sources.
We wanted to provide task lighting for the dining table without making a mess of the walls and ceiling. After a bit of research, I came across this plug-in pendant by Tala. It’s super easy to install. It comes with two wall and ceiling nodes which you use to hang it over the area that you want to light, and then simply plug it in. Not a bad price at £150 and it looks great!
Also note the lovely gallery wall. The client gave me a list of artists that she likes and travels that she’d been on for me to use as inspiration. She has such great taste in art, and this gallery wall adds so much personality to the space.

In the lounge area, we used a fringed pendant light shade from Oliver Bonas, and added a floor lamp next to the sofa for task lighting.
6. Add a room divider
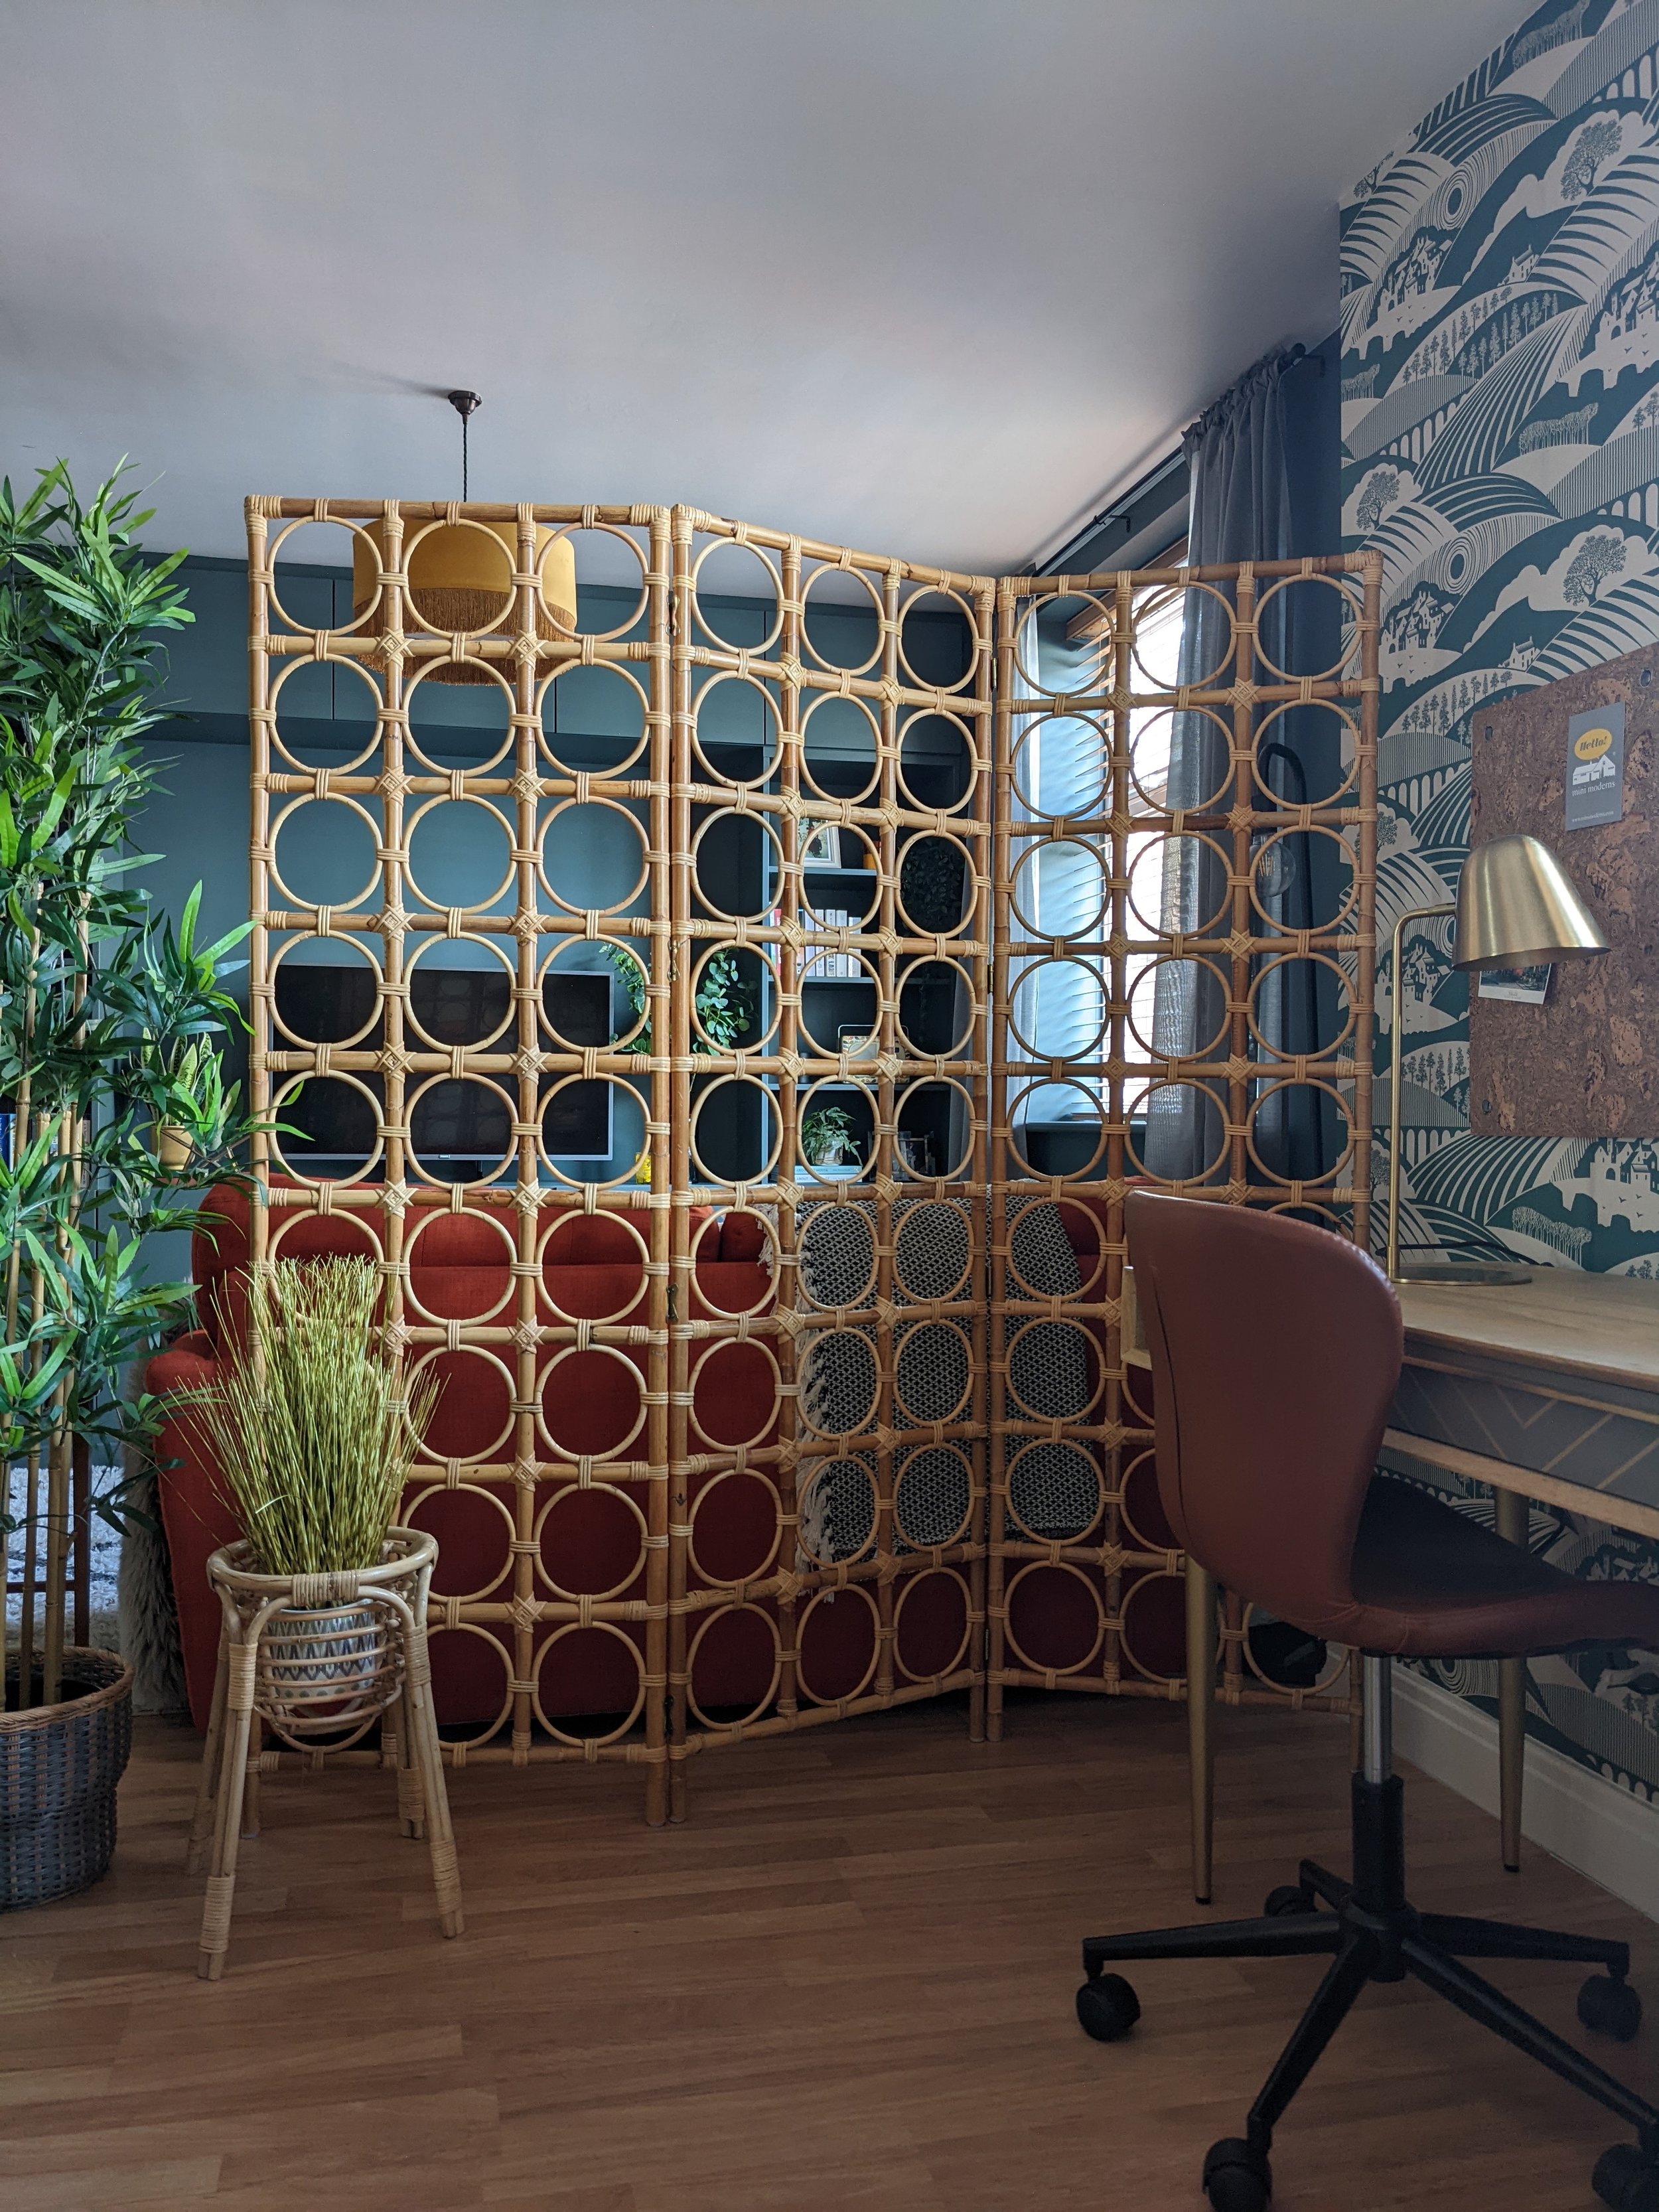
Using a room divider is an easy and affordable way of separating an open plan room. The Tavi rattan room divider from Urban Outfitters creates a divide between the home office area and lounge zone while still letting light through. We added plants for additional screening - the large artificial bamboo was an IKEA bargain at just £55. It looks much more expensive.
7. Use the same styles throughout

From the dining furniture and desk to the art prints, I continued the mid-century theme throughout the different areas to create a nice flow between zones. This record cabinet is a vintage piece that I found on eBay. The warm teak contrasts beautifully with the cool wall colour, and it looks great with the client’s existing artwork. For advice on how to incorporate mid-century furniture into a room scheme, click here.
So what do you think? Let me know in the comments. The little girl who lives here is certainly happy with it. She said to her mum, “Mummy, now it feels like a home.” How lovely is that?!
For more new-build living space inspiration, take a look at my blog posts on how to make a living room in a new build home feel cosy and the final reveal of an open plan family kitchen-living space.
I’m a Halifax based interior designer and I cover surrounding areas, including Leeds and Manchester. I also offer online interior design packages. If you’re starting a project and need some help or inspiration, please get in touch.
